How to Build an Assessment from Scratch (Custom & AI Tests)
Hazel Hernandez
Guide
May 22, 2026
6 min read

If you need a highly tailored screening tool that isn't covered by our pre-built library, Ref Hub allows you to build your own tests. You can either let our AI quickly construct tailored questions based on a job description, or manually design a template using our drag-and-drop question builder.
Follow this step-by-step guide to create, customize, and publish your own custom tests.
Step 1: Access the Custom Test Tab
- Log in to the Ref Hub portal at portal.refhub.com.au/auth/login.
- Click on Assessments in the left-hand navigation menu.
- Select the third tab at the top of the workspace labeled Custom Test.
Tip: From this screen, you can use the filters to search for and reuse custom tests you or your team have already built in the past.
Step 2: Initiate the Test Builder
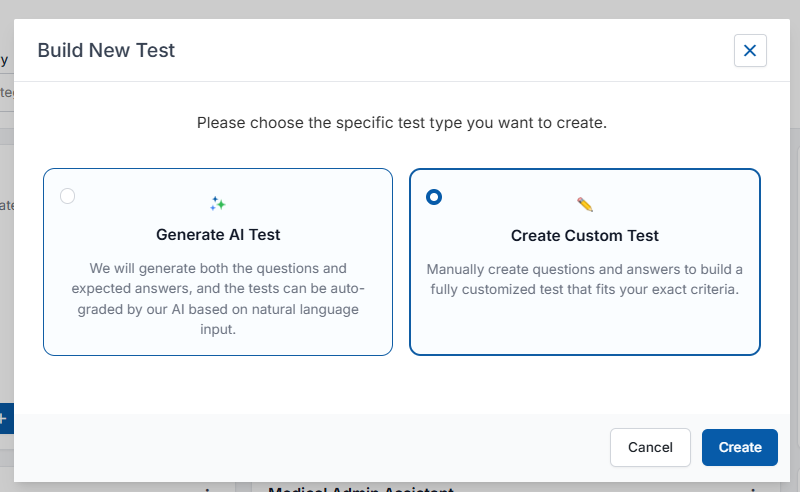
- To start fresh, click the blue + Build New Test button located in the top-right corner of the page.
- A modal will prompt you to choose between two creation methods:
- Generate AI Test: Best for saving time. The AI generates contextual questions and expected answers based on natural language input or a job description.
- Create Custom Test: Best for total control. You manually write every question and answer choice to meet exact evaluation criteria.
- Select your preferred option and click Create.
Step 3: Complete the Initial Test Setup
Depending on the path you selected in Step 2, fill out the creation form:
Option A: If you chose "Generate AI Test"
- Test Name: Give your test a clear title.
- Industry & Test Category: Select the appropriate industry sector and tracking categories.
- Difficulty Level & No. of Questions: Choose the seniority tier and specify how many questions you want the AI to formulate.
- Test Purpose (or paste Job Description): Provide specific technical criteria or paste your job description directly into the text box (up to 1,000 characters) so the AI understands exactly what skills to test.
- Click Build Test to automatically generate your template.
Option B: If you chose "Create Custom Test"
- Fill out the mandatory Test Name, Difficulty Level, and Test Category fields.
- Test Summary: Provide a short overview explaining what competencies this test evaluates.
- Click Build Test to open the manual editing canvas.
Step 4: Design Your Test Template (Manual Builder)
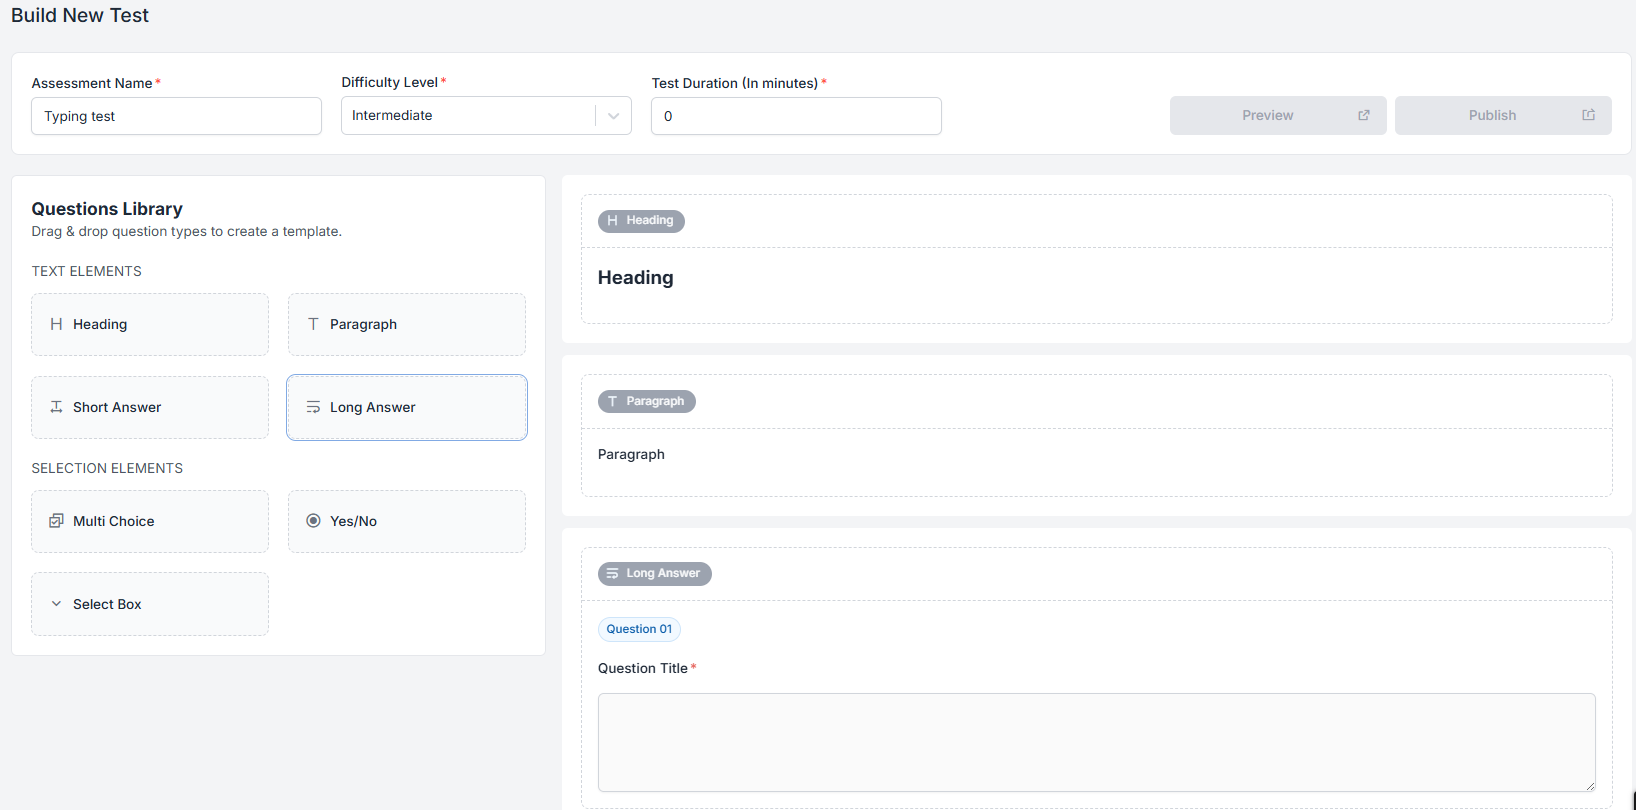
If you chose to build a manual custom test, you will be taken to our visual, drag-and-drop workspace canvas.
- Set the Duration: At the top of the canvas, type the time limit into the Test Duration (In minutes) input box.
- Add Question Elements: Locate the Questions Library panel on the left side of the screen. Drag your desired elements directly into the main Drop Zone canvas on the right:
- Text Elements: Use Heading or Paragraph for section layouts/instructions, and Short Answer or Long Answer for open-ended response questions.
- Selection Elements: Use Multi Choice, Yes/No, or Select Box dropdowns to build closed-ended objective grading questions.
- Click on the fields within the Drop Zone to type out your specific questions, configure response choices, and flag the correct answers.
Step 5: Preview and Publish Your Test
- Preview: Click the Preview button in the top-right corner at any time to test the layout and see exactly how the questions will appear to an applicant.
- Publish: When you are satisfied with the configuration, click the Publish button.
Once published, your test will be permanently saved to your Custom Test repository. You can seamlessly combine it with other tests, set your customized pass marks, and instantly deploy it to candidates from your primary assessment menu!
https://www.refhub.com.au/post/how-to-build-an-assessment-from-scratch-custom-ai-tests
Related Articles


English (United Kingdom)